SSD Forensics
Conducting a forensic investigation of a solid state drive (SSD) or other type of flash memory device is inherently more challenging and carries a greater risk of altering or destroying evidence, when compared to working with mechanical hard disk drives. An SSD may change its internal state via firmware operations at any time the device has power, even if a write blocker is used when preparing a bitstream image. To avoid possibly changing evidence, advanced techniques are recommended for imaging SSDs, such as desoldering the chips or using Factory Access Mode. Open-Channel SSDs are a potential future technology that may simplify low-level imaging but make bypassing encryption more difficult.
Video Lecture
Flash Storage
Solid state drives are a type of flash memory storage. Most SSDs, flash drives, and memory cards use layers of NAND flash, which is a particular type of storage circuit. As illustrated in Figure 1, empty cells of NAND flash store the value 1. To store a 0 into a NAND flash cell, an electron is inserted into the cell.
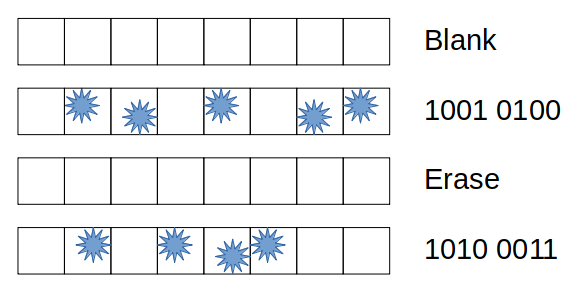
Whenever the value of a flash cell needs to be changed back to 1, an erase operation is performed. This operation opens the flash cell, allowing the electron to escape. Cells cannot be erased individually; instead, a whole group of cells, called an erase block, must be opened at the same time. Opening the erase block lets all the electrons escape, resetting the values stored in all the cells to 1.
Cell Wear, Write Limits, and Overprovisioning
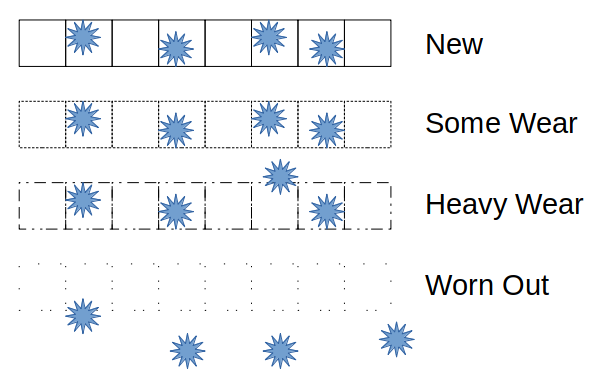
Erasing a block of cells slowly destroys the material that retains the electrons in the block. As cells wear out, the electrons can escape through weaknesses in the cell material, rendering the flash memory incapable of storing data reliably (Figure 2).
Historically, flash memory applications were limited to devices that were programmed infrequently. Older flash memory systems were unsuitable for general-purpose computing, since they would wear out too quickly with normal day-to-day use. Technology has improved such that newer flash memory cells have much higher write endurance, making them practical for use in typical computers. In addition, firmware tricks are used inside storage devices to reduce the number of writes per cell and swap good cells for failing ones.
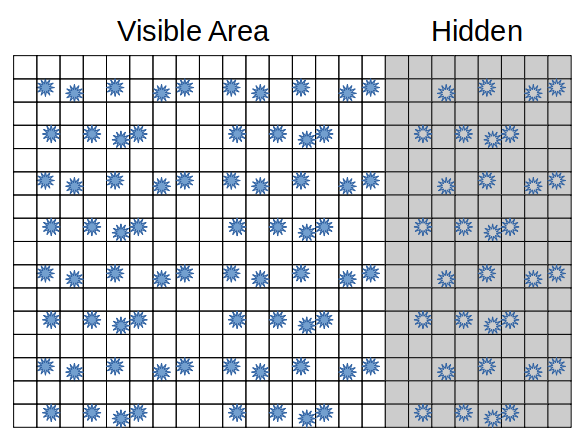
One common approach for improving the overall reliability of an SSD is to overprovision the device with more physical flash memory than is made available for storing data (Figure 3). This extra flash memory is held in reserve by the drive and is not visible to the operating system or to the user of the computer. The drive firmware may, however, remap some of this hidden memory into the usable memory space, swapping it with memory that was in the usable space (and is then moved into the hidden space).1 If the drive firmware doesn’t happen to erase the flash cells when performing this swap, the hidden area of the drive could potentially contain evidence.
Wear Leveling and Cell Replacement
By moving data around in the SSD and swapping hidden and visible areas, data writes can be spread out over a larger number of cells. Averaging the total number of data writes across a larger number of flash cells decreases the number of writes per erase block. This approach, called wear-leveling, helps to improve SSD longevity by reducing premature cell wear.
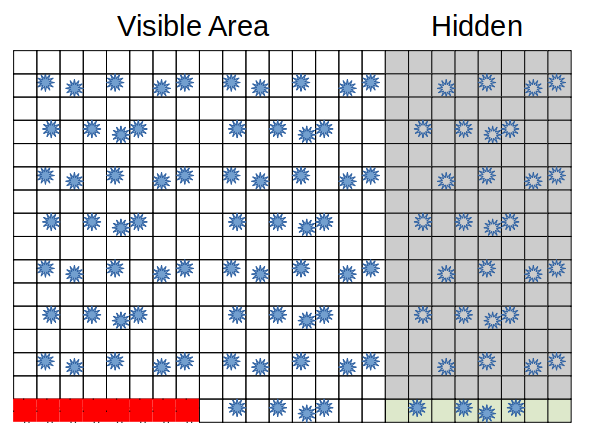
If a group of flash cells does wear out, the firmware may be able to substitute a group from the over-provisioned space as a replacement, extending the life of the drive. Figure 4 depicts the replacement of a block of worn cells with a block of working cells. The worn cells are then marked as bad and are no longer used. Data may or may not be recoverable from the worn region, but the reliability of the worn region will be problematic in any case.
Write Amplification and TRIM
SSDs are able to write blocks of data in smaller increments than their erase block sizes, allowing small pieces of data to be stored without first having to erase an entire block. A downside to this capability is that a lot of small pieces of data can become scattered around the drive over time. Whenever a large piece of data needs to be written, the drive might first have to collect the small pieces of data and pack them more efficiently into empty erase blocks, allowing the large collection of partially used blocks to be erased for use with the new data. Since the drive has to perform this extra work before writing the new data, its performance slows down during this process. This phenomenon is known as write amplification.2
As a performance boost to avoid write amplification, SSDs provide a way for the operating system to mark which units of data are no longer in use. This feature, which is usually called TRIM support (named after the ATA storage controller command that implements it), allows the SSD firmware to reclaim unused blocks, erasing them in advance while the disk isn’t busy with other operations. Using TRIM reduces the effects of write amplification, improving performance.
However, TRIM presents a specific problem for a digital forensic investigation. Since the SSD might not erase TRIMmed blocks immediately, and the machine could be powered off before the operation occurs, evidence might be stored in regions of the SSD marked for TRIM. Whenever the SSD next has electrical power, the firmware inside the drive can then perform the delayed TRIM operations on its own, without any command from the computer. Consequently, the use of a write blocker will not necessarily prevent changes to, or loss of, evidence stored on the SSD.
Secure Erasure
Since SSDs can move data into and out of overprovisioned space, removing the files they contain cannot be done reliably by simply overwriting the drive with data (which is the standard way to wipe a mechanical hard disk drive). Instead, wiping has to be done using secure erase procedures provided by the drive firmware. These procedures can be used to restore a drive that is suffering from too much write amplification (after backing up the data, of course). They are also used when preparing a drive for sale, disposal, or reuse in another system.
If secure erase is implemented correctly (which is not guaranteed, since drive firmware is usually opaque and difficult to analyze), this feature erases all the memory cells, including ones in the hidden area of the drive. No cost-effective procedure would recover the data after such an operation. Use of an electron microscope to do a forensic reconstruction based on flash cell wear is theoretically possible but is cost prohibitive and may or may not yield useful results.
Forensic Techniques for Imaging SSDs
Wear leveling, cell replacement, queued TRIM operations, and secure erasure are all implemented in the SSD firmware, which is special software that runs on the SSD itself. Firmware operations can run on their own at any time that an SSD is connected to power. Consequently, using a write blocker does not prevent all changes to an SSD! A previously queued operation could run as soon as the device has power, resulting in the loss of any evidence contained on the device. Consequently, solid state drives need to be imaged using other techniques.
Chip-Off Recovery
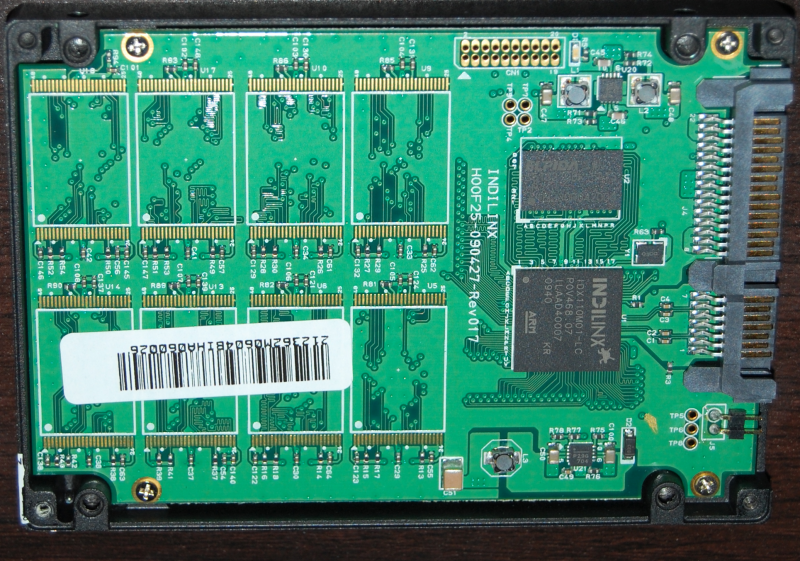
To perform a chip-off recovery of the data on an SSD, the investigator must de-solder the flash memory chips from the circuit board inside the SSD and use special hardware to read the chips directly. In order to be able to reconstruct the user-level data, specialized tools and knowledge of the structures and layout used by the specific SSD firmware are required. This process requires detailed knowledge from the SSD manufacturer and is expensive. It is also quite slow, requiring about 2 weeks for a 4-chip SSD. Chip-off recovery is impractical for SSDs with 10 more chips.3
In response to data recovery (and potential theft) by de-soldering chips, SSD manufacturers started including firmware logic to encrypt the data at rest on each chip. Without the encryption key, recovery of the original data is essentially impossible, even if the storage layout is known. However, it turns out the SSD manufacturers were a bit lazy about protecting the encryption key and make it easy to recover if low-level access to the firmware can be obtained.4
Most types of flash storage have a special mode designed for the manufacturer to gain low-level access to the storage chips, known as Factory Access Mode. Commercial forensic tools are available that can put the drive into this mode, preventing delayed erase operations from occurring. Moreover, Factory Access Mode allows for reading the encryption key directly from the drive firmware, enabling a usable bitstream image to be obtained from the device, without changing the original evidence. Since Windows BitLocker simply falls back to the SSD’s internal encryption system, Factory Access Mode also permits bypassing BitLocker and obtaining the unencrypted evidence.5
It should be noted that bypassing encryption using Factory Access Mode is only possible when all the encryption present on a system has been performed by the SSD itself. Among other encryption systems, TrueCrypt, the Linux Unified Key Setup (LUKS), and encryption systems derived from TrueCrypt and LUKS encrypt the data before it is sent to the SSD. Consequently, it will not be possible to obtain unencrypted evidence from an SSD if one of these systems is in use, unless the encryption key is either known or is simple enough to guess.
Open-Channel SSDs
As SSD read and write speeds have increased, the controller on the drive can become a bottleneck that limits ultimate performance. An alternative implementation of an SSD, in which the low-level flash memory is exposed directly to the host computer, has been proposed. This approach, called an Open-Channel SSD, lets the computer operating system manage the low-level layout on the storage device.6 While some initial proof-of-concept devices have been developed, the researchers behind this initiative appear to have moved onto a different type of controller-based SSD design, which is affiliated with a major manufacturer of controller-based devices.7
In theory, forensic bitstream imaging should be easier with Open-Channel SSDs (or whatever similar architecture eventually succeeds them), since all the storage blocks will be exposed for analysis, and a write blocker could be effective in preventing erase operations. However, once the operating system (and thus, with open-source OSes, the user) takes control of the flash drive at a low level, bypassing encryption with Factory Access Mode will not be possible. Effectively, the SSD will be in the equivalent of Factory Access Mode at all times, with encryption keys properly secured by the OS.
Notes and References
-
Kingston Technology. “Understanding SSD Over-provisioning (OP).” ↩
-
Anand Lal Shimpi. “The Cleaning Lady and Write Amplification.” In “The SSD Relapse: Understanding and Choosing the Best SSD.” ↩
-
Oleg Afonin. “Life after Trim: Using Factory Mode to Image SSD Drives.” Elcomsoft Blog, 2019. ↩
-
Ibid. ↩
-
Ibid. ↩
-
Matias Bjørling, Javier Gonzalez, and Philippe Bonnet. “LightNVM: The Linux Open-Channel SSD Subsystem.” 15th USENIX Conference on File and Storage Technologies (FAST 17). USENIX Association. Santa Clara, CA, February 2017. ↩
-
Western Digital Corporation. Zoned Storage. ↩
